Table of Contents
So, you want to put permanent art on people's skin? That's a serious gig. Nobody wants to be someone's first attempt at a complex dragon or even a simple line work piece without significant preparation. That preparation boils down to one critical thing: practice. Mastering tattoo designs to practice is not optional; it's the bedrock of a solid tattooing career. It's the difference between confident, clean lines and shaky, blown-out messes that clients regret the moment they see them. Think of it like learning to drive – you don't just hop on the freeway without spending hours in a parking lot first.
Why Perfecting Tattoo Designs to Practice is NonNegotiable
Why Perfecting Tattoo Designs to Practice is NonNegotiable
It's About More Than Just Drawing Skill
Look, anyone can doodle. You might even be pretty good with a pencil on paper. But translating that to pushing needles and depositing ink under someone's skin? That's a different beast entirely. The medium fights back. Skin isn't flat or predictable like paper. It stretches, it wrinkles, it bleeds. Perfecting tattoo designs to practice isn't just about refining your artistic vision; it's about learning how the machine feels in your hand, how different needle configurations lay down ink, and how varying depths affect the final outcome. Skipping this step is like expecting to perform surgery after only reading textbooks. It's reckless.
Building Muscle Memory and Confidence
Repetition breeds mastery, especially when it comes to something as finicky as tattooing. You need to build that muscle memory so your hand moves confidently and consistently, even when outlining a tricky curve or packing color into a tight spot. Practicing tattoo designs helps you internalize the rhythm of the machine and the feel of the needle against the practice surface. You learn to judge pressure without thinking, to pull lines that are solid and even, not wobbly or blown out. This isn't just about making pretty pictures; it's about developing the physical control necessary to execute your art cleanly and safely on a living canvas.
What happens if you don't put in the hours practicing?
- Shaky lines that look amateurish.
- "Blowouts" where ink spreads under the skin, blurring the design.
- Uneven shading or color packing.
- Increased risk of damaging the client's skin.
- A reputation for doing sloppy work.
Earning Trust and Avoiding Regret
Your clients are literally entrusting you with their skin for the rest of their lives. That's a massive responsibility. Showing up unprepared, without having diligently worked on tattoo designs to practice, is a betrayal of that trust. Every blown line or patchy fill is a permanent reminder of your lack of preparation. Think about the ethical implications – you're selling a service that has lasting consequences. Clients deserve your best effort, and your best effort comes from dedicated practice. Nobody wants a tattoo that looks like it was done by someone still figuring things out. Earn their trust by putting in the work beforehand.
First Strokes: Simple Tattoo Designs to Practice for Beginners
First Strokes: Simple Tattoo Designs to Practice for Beginners
Starting with the Building Blocks: Lines and Shapes
so you've got your machine, your power supply, maybe some practice skin or fruit (we'll get to surfaces later). Where do you even begin putting ink down? Don't try to tattoo a portrait of your dog on day one. Start ridiculously simple. We're talking straight lines. Wavy lines. Circles. Squares. These might sound painfully basic, but executing them perfectly with a tattoo machine is harder than it looks. You need to maintain consistent speed, pressure, and angle to get a solid, even line. Practice pulling lines in every direction. Practice making perfect circles and smooth curves. These fundamental tattoo designs to practice are the absolute bedrock. If you can't do a clean line, everything else you attempt will look wobbly and unprofessional.
Simple Designs That Teach Control
Once you're somewhat comfortable with basic lines and shapes, combine them into simple tattoo designs to practice. Think geometric patterns – grids, dots, simple mandalas. These force you to focus on precision and consistency. Another classic beginner exercise is simple script or lettering. Pick a basic font and practice tattooing single letters or short words. It teaches you control over tight turns and varying line weights. Dots are also fantastic for practice; learning to make uniform dots at consistent spacing builds incredible control. Don's underestimate the power of simple repeated elements.
Here are a few simple tattoo designs to practice when you're just starting:
- Straight lines (horizontal, vertical, diagonal)
- Wavy lines and curves
- Basic geometric shapes (circles, squares, triangles)
- Dot work patterns
- Simple block lettering
- Basic stars or hearts
Leveling Up: Complex Tattoo Designs to Practice and Techniques
Leveling Up: Complex Tattoo Designs to Practice and Techniques
Adding Dimension: Shading and Color Packing
you've nailed those clean lines. You can pull a straight line that looks like it was drawn with a ruler and make circles that are actually round. Great. But tattoos aren't just outlines, are they? Now it's time to add some meat to the bones – literally, if you're practicing on fake skin that mimics flesh. This means tackling shading and color packing. Shading isn't just scribbling; it's about controlling needle depth, angle, and speed to create smooth gradients or textured effects like stippling or whip shading. Color packing requires a different touch entirely, pushing ink into the skin evenly without overworking it and causing unnecessary trauma. These are complex tattoo designs to practice because they require a nuanced feel for the machine and the surface.
Tackling Intricate Patterns and Textures
Beyond basic gradients, you'll want to practice designs that feature intricate patterns and textures. Think scales, wood grain, fabric folds, or detailed hair. These elements push your control and understanding of how ink sits in the skin to create visual interest and realism. Mandalas, once you move past the simple geometric ones, become excellent complex tattoo designs to practice, demanding precision in repetition and symmetry. Learning to render different textures convincingly on a 3D surface is a skill that takes serious dedication and countless hours of practice.
Techniques to focus on when practicing complex designs:
- Smooth black and grey gradients
- Whip shading (creates a feathered effect)
- Stippling (dot work shading)
- Color blending and packing
- Creating realistic textures (scales, fur, wood)
- Executing fine line detail within larger pieces
Putting It All Together: Composition and Flow
Once you're comfortable with individual techniques like lining, shading, and texture, the real challenge is combining them into cohesive tattoo designs to practice. This means working on full pieces that have a beginning, middle, and end. Focus on how different elements interact, how shading guides the eye, and how the design flows with the contours of a body part (even a practice one). This is where composition becomes crucial. Are the elements balanced? Does the design read clearly from a distance? Can you execute complex details without losing the overall impact? This stage is about synthesizing all your skills into a finished product that looks professional and holds up over time. It's less about repeating a single motion and more about managing a complex project from start to finish. What's the most challenging complex design you've attempted to practice so far?
Choosing Your Canvas: Best Surfaces and Tools for Tattoo Practice
Choosing Your Canvas: Best Surfaces and Tools for Tattoo Practice
Choosing Your Canvas: Best Surfaces and Tools for Tattoo Practice
Alright, so you've got your machine humming and you're ready to lay down some ink on those tattoo designs to practice. But you can't just go at it on the kitchen table. The surface you practice on matters. A lot. It needs to simulate the feel and resistance of real human skin as closely as possible, because paper, while great for drawing, doesn't stretch or react like flesh. Using the wrong surface is like training for a marathon by swimming – you're moving, sure, but it's not the right kind of resistance. You need something that gives you feedback on your depth and pressure, something that shows you how the ink sits and if you're tearing the skin (even fake skin).
Avoiding Pitfalls: Common Errors When Working on Tattoo Designs to Practice
Avoiding Pitfalls: Common Errors When Working on Tattoo Designs to Practice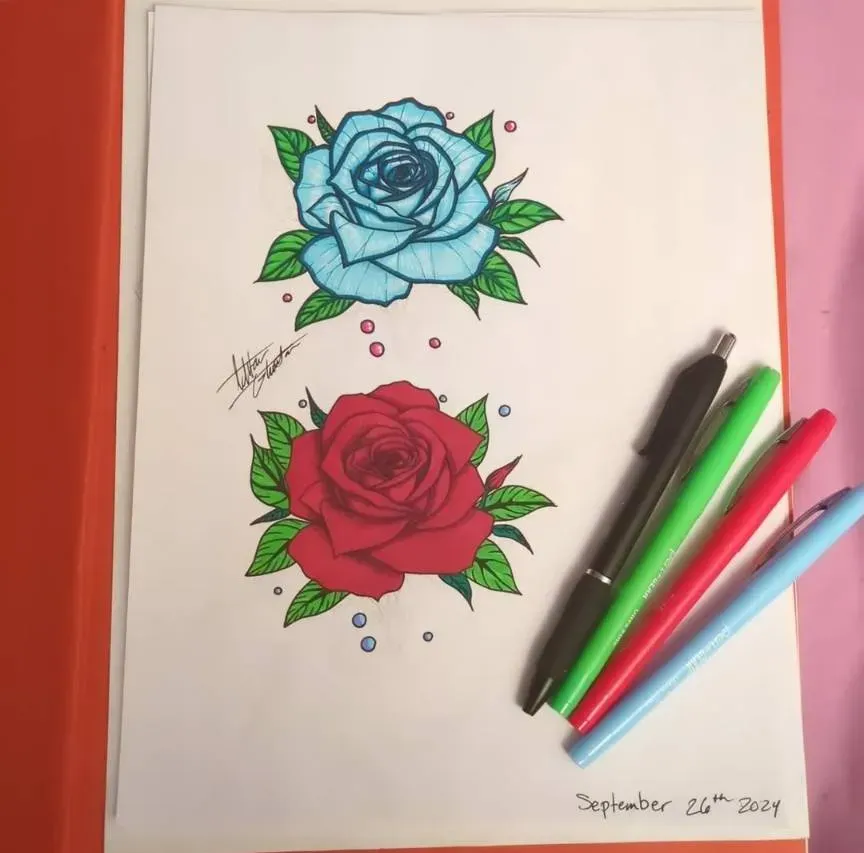
Ignoring Depth and Speed
So you're buzzing away, feeling like a pro, but are you paying attention to how deep that needle is actually going? Too many beginners act like they're just drawing with a pen, pushing too hard. That's how you get blowouts – that fuzzy, blurred look around your lines because the ink went past the dermis layer. It's permanent and looks terrible. On the flip side, go too shallow, and the ink just won't stay; it'll look faded or disappear altogether when it heals. Speed matters too. Move too fast and the needle doesn't have time to deposit ink properly, leaving patchy lines. Too slow, and you risk tearing the skin or overworking an area, leading to scarring or blowouts. Getting the right combination of depth and speed is arguably the hardest part, and it's where most practice errors happen.
Poor Stencil Application and Rushing the Process
You've got a killer design ready, but if you slap that stencil on crooked or don't let it dry completely, you're setting yourself up for failure before you even start the machine. A bad stencil is a blueprint for a bad tattoo. Another common mistake? Rushing. Whether it's rushing the design phase, rushing the stencil, or rushing the actual tattooing, impatience kills good work. Take your time. Plan your passes. Don't try to finish a complex design in one go if your practice surface (or future client) can't handle it. Break it down. Work methodically. Trying to speedrun learning a craft like this only results in sloppy, regrettable outcomes.
Common pitfalls to actively avoid during practice:
- Inconsistent needle depth
- Incorrect machine speed for the technique
- Pushing too hard (causes blowouts)
- Not letting stencils dry fully
- Wiping the stencil off prematurely
- Overworking a single area
- Trying overly complex designs too soon
- Ignoring the texture and resistance of the practice surface
The Ink Doesn't Lie: Consistent Practice Pays Off
Look, there's no magic shortcut to becoming a good tattoo artist. You can't just watch a few videos and suddenly be ready for skin. The journey from shaky lines on practice skin to confident work on a client is paved with countless hours spent working on tattoo designs to practice. We've covered starting simple, pushing to complex, getting the right gear, and dodging common screw-ups. It all circles back to the same point: the deliberate, often tedious, repetition of practicing designs. Embrace the grind, learn from every wobbly line and blown-out edge on your fake skin. Because when you're finally working on someone's arm, there's no undo button, and the quality of your practice will be painfully obvious if you skipped steps.