Table of Contents
Thinking about getting inked? Or maybe you're the one doing the inking? Either way, the journey usually starts somewhere far less permanent than skin. It starts with tattoo designs on paper. Skipping this crucial step is like trying to build a house without a blueprint – messy, unpredictable, and likely to collapse. You wouldn't just walk into a shop and point at a random flash sheet, hoping for the best, would you? Probably not, unless you enjoy surprises that last forever.
Why Put Tattoo Designs On Paper Before Ink?
Why Put Tattoo Designs On Paper Before Ink?
so you've got this killer idea for a tattoo bouncing around your brain. Maybe it's a majestic dragon, a tiny meaningful symbol, or something completely off the wall. Now, you could just march into a tattoo shop, try to explain it to an artist with wild hand gestures, and hope for the best. Or, you could take the much smarter route and put those tattoo designs on paper first. Why? Because paper is cheap, skin is not. It's your low-stakes playground to experiment with size, placement, line weight, and overall composition. You can redraw it five, ten, twenty times until it feels right, making tweaks that would be a nightmare to fix once the needle hits. It's your chance to catch potential issues – like that detail that looks cool small but turns into an illegible blob when scaled up – before they become permanent regrets etched into your dermis. Seriously, think of it as your artistic seatbelt; you wouldn't drive without one, so don't get tattooed without a solid paper plan.
Gather Your Arsenal: Tools for Drawing Tattoo Designs
Gather Your Arsenal: Tools for Drawing Tattoo Designs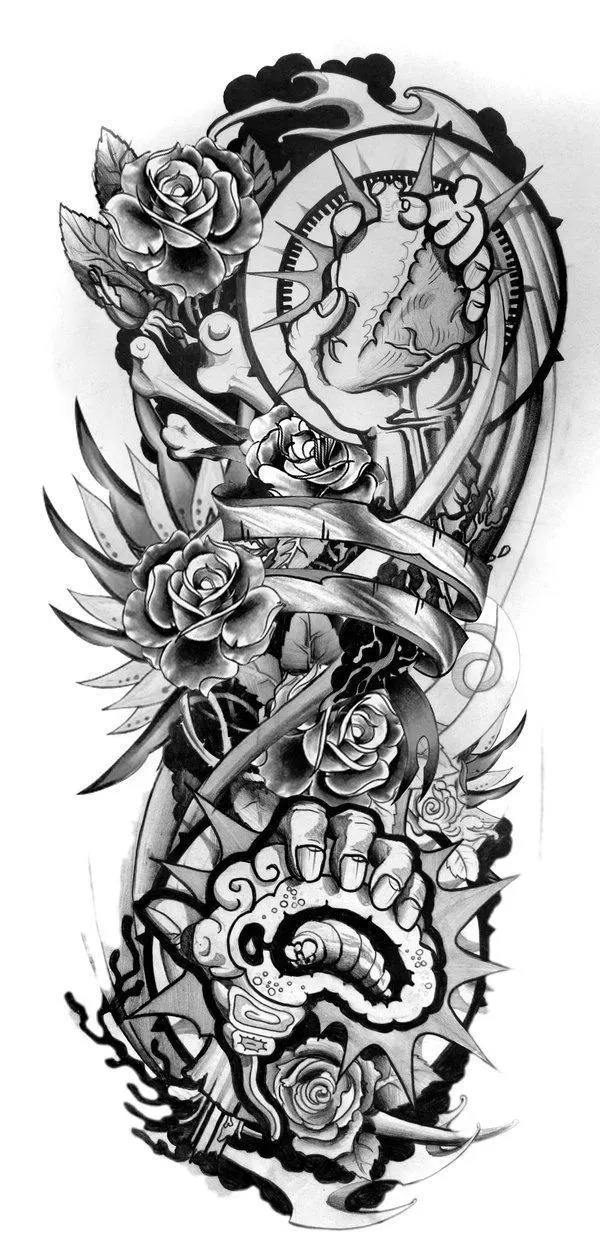
The Pencil and Paper Foundation
Alright, so you've committed to putting your tattoo designs on paper first. Smart move. Now, what do you actually need to get started? Forget fancy gadgets for a second. Your absolute basics are pencils and paper. Don't just grab the dusty number 2 from your junk drawer. Get yourself some drawing pencils with varying degrees of hardness – maybe a 2H for light sketching, an HB for general drawing, and a 2B or 4B for darker lines and shading. This gives you control over your line work right from the jump. As for paper, a decent sketchpad with a bit of tooth (texture) works wonders. Avoid super smooth printer paper; it doesn't hold graphite or ink as well. Think about the size you're working with – if your design is complex, you'll need more space than a tiny sticky note.
Inking Your Vision
Once the pencil sketch is solid, you'll want to ink your tattoo designs on paper to see how they'll translate to the final medium. This is where pens come in. Fine-liner pens are your best friend here. Look for archival quality, waterproof ink – you don't want your lines smudging if you decide to add washes or color later. Micron pens are popular, coming in various tip sizes, allowing you to create crisp, clean lines or thicker outlines. Brush pens are also great for adding dynamic line weight and filling in larger black areas quickly. Experiment with different brands and tip types to find what feels right in your hand. This stage is crucial for defining the final look of your tattoo designs on paper.
- Variety of graphite pencils (2H, HB, 2B+)
- Quality sketchpad or drawing paper
- Fine-liner pens (various tip sizes)
- Brush pen (optional, for bold lines/fills)
- Good quality eraser (kneaded and plastic)
- Ruler or straight edge
Beyond the Basics: Erasers and Extras
Mistakes happen, even when crafting brilliant tattoo designs on paper. That's where good erasers save the day. A kneaded eraser is fantastic for lifting graphite without damaging the paper surface, perfect for cleaning up sketches. A plastic or rubber eraser is necessary for more precise removal of pencil lines before inking. Don't skimp here; a cheap eraser can smudge or tear your paper. Other helpful tools include a ruler or straight edge for geometric elements, and maybe even a light box if you need to transfer or refine a sketch. Some artists are moving towards digital tools like tablets and styluses, which offer incredible flexibility, but there's still a certain magic and tactile feel to creating tattoo designs on paper with traditional tools. It forces you to commit in a different way.
Level Up Your Art: Techniques for Killer Tattoo Designs On Paper
Level Up Your Art: Techniques for Killer Tattoo Designs On Paper
Getting Your Design to Flow
so you've got your pencils, pens, and paper ready. Now comes the fun part: actually making those tattoo designs on paper look good. It's not just about drawing a cool picture; it's about creating something that will work as a tattoo. First up, composition is king. A design needs to flow with the body part it's intended for. A dragon wrapping around an arm needs a different layout than one sprawled across a back. Think about the curves and muscles. Sketch lightly, blocking in the main shapes. Don't be afraid to use the whole page, or even tape multiple pieces together for larger concepts like sleeves or back pieces. Consider negative space – the area *around* the design. It's just as important as the positive space. A well-placed bit of negative space can make the main subject pop or give the eye a place to rest. Ignore composition, and you'll end up with something that looks tacked on, not integrated.
Making Your Lines Sing and Shadows Speak
Once your composition feels right, it's time to dive into the details. This is where line work becomes critical for tattoo designs on paper. Tattoos live and die by their lines. They need to be clean, confident, and varied. Don't draw everything with the same thin line. Use thicker lines for outlines to make the design readable from a distance, and finer lines for internal details. Practice pulling long, consistent lines. Shading is the next frontier. You're not just coloring in; you're creating depth and texture. Learn techniques like whip shading (quick flicks of the pen to create gradients), stippling (dots, dots, and more dots), and smooth greywash blends. Look at how experienced tattoo artists render different textures – skin, metal, fabric, fur. Recreating that look accurately on paper is key to knowing if you can pull it off with a needle. It takes practice, a lot of it. Your first attempts might look rough, but stick with it.
Ready to refine your tattoo designs on paper?
- Study anatomy to understand how designs fit the body.
- Practice drawing clean lines of varying thickness.
- Experiment with different shading techniques: whip shading, stippling, cross-hatching.
- Analyze existing tattoos you admire – how do they use line weight and shading?
- Draw the same design multiple times, focusing on improving one element each time (e.g., line consistency, shading smoothness).
- Get feedback from other artists or friends.
Beyond the Sketchpad: Turning Tattoo Designs On Paper Into Reality
Beyond the Sketchpad: Turning Tattoo Designs On Paper Into Reality
From Paper to Skin: The Stencil Stage
you've poured hours into those tattoo designs on paper. You've got the lines crisp, the shading planned, the composition locked down. It looks fantastic on the page. But how does it get from that flat surface onto a living, breathing, curved human body? You don't just freehand it, hoping for the best, not unless you're aiming for something truly abstract and probably regrettable. The critical next step is creating a stencil. Your finished design is typically printed or drawn onto special thermal paper. This paper reacts to heat, transferring the design onto a carbon sheet below. That carbon sheet is then pressed onto the prepared skin, leaving a temporary outline – your roadmap for the needle. This stencil is a direct translation of your meticulously crafted tattoo designs on paper, proving why all that drawing practice wasn't just busywork. It's the bridge between your artistic vision and the final inked reality.
From Paper to Permanence: The Final Sketch
So, you've put in the work. You've sketched, refined, and finalized your tattoo designs on paper. You understand the tools, the techniques, and why this step is non-negotiable before anything sharp touches skin. This isn't just doodling; it's laying the groundwork, solving problems before they become permanent mistakes, and ensuring the vision in your head translates accurately. The paper phase is where the real planning happens. What comes next is the transformation – taking those carefully crafted tattoo designs on paper and bringing them to life, a process that demands respect for the art, the medium, and the permanence of the canvas.